

A lot of golfers are standing in the same spot right now. They have a launch monitor session saved somewhere, a rough sense that two clubs fly the same number, and one or two yardages on the course they never trust. The bag feels mostly fine until a forced carry, a long par 3, or a second shot into a tight landing zone exposes a distance window that has no real club assigned to it.
A golf bag gap analyzer matters because those misses usually aren't swing mistakes. They're bag-structure mistakes. The player didn't choose the wrong strike. The player chose from incomplete distance windows.
Table of Contents
- Why Your Bag Has Gaps You Can't See
- Preparing Launch Monitor Data for the Analyzer
- Importing and Configuring Your Session
- Reading the Gapping Chart and Tolerances
- Diagnosing Common Gap Problems
- Turning Gaps Into Practice and Fitting Actions
- Workflows for Players, Coaches, and Club Operators
Why Your Bag Has Gaps You Can't See
A player shows up with a perfectly reasonable story. The 4-hybrid goes about 200. The next club up is supposed to cover the low 220s. On the course, though, the 212 to 218 window feels like guesswork. That is the kind of problem a gapping session exposes fast, especially once the shots are sorted by carry in a launch-monitor CSV instead of memory.
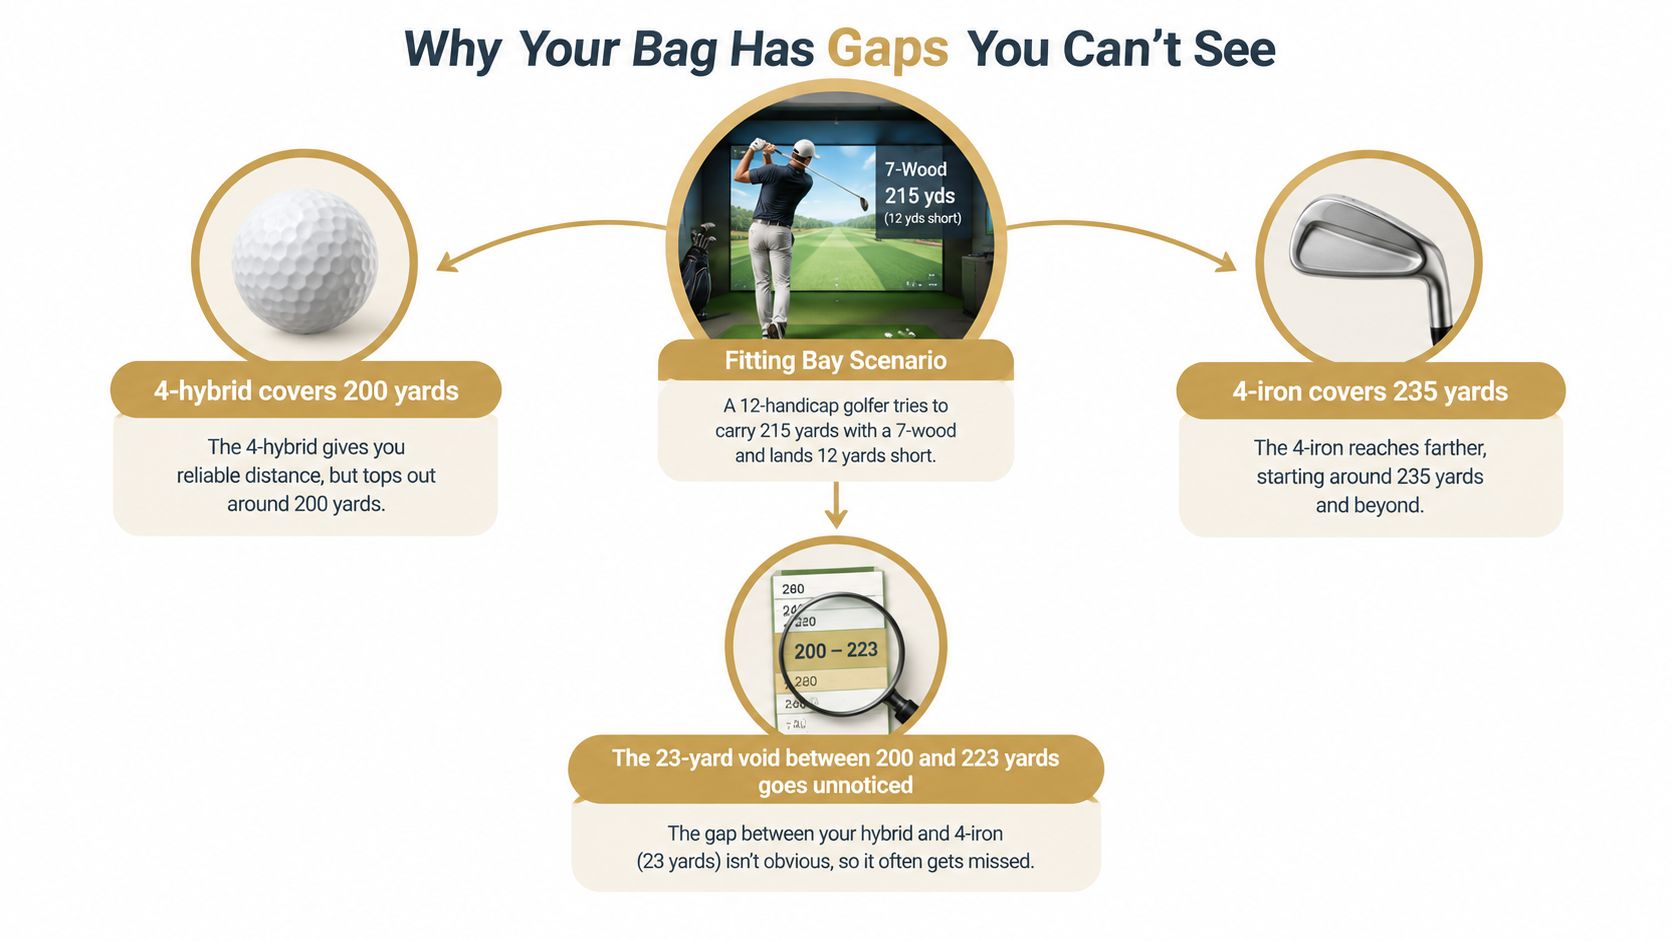
Hidden gaps usually come from one of three causes. Loft spacing drifted over time. One club launches too much like its neighbor. Or a club stayed in the bag because of confidence, not because it owns a clear yardage. In a desktop workflow like Dialed Golf, those issues show up clearly once the CSV is cleaned and each club's normal carry pattern is laid next to the next one.
Course play hides this better than players expect. A golfer remembers the flushed 7-wood, the trapped hybrid, or the one long iron that chased forever downwind. A bag analysis cares about the repeatable window, not the story attached to a single shot. After hundreds of sessions, that is the biggest difference between what golfers believe their set does and what the exported session shows.
A gap analyzer works on ownership. Each club should hold a distinct carry range with enough separation to justify the slot and enough continuity that the next shot up does not require a manipulated swing. When that structure breaks, the fix is usually specific. Replace an overlap club. Bend loft. Change the top-end mix. Add a partial wedge matrix. Then re-test the exact window that failed.
Published summaries of shot-tracking data support the broader point that gapping problems are common across amateur bags. One linked recap reports that almost every golfer in the sample had at least one bad yardage window, and many had more than one (Golf Launch Lab summary of published gapping data). The exact percentages matter less than the pattern fitters see every week. Bags often look fine by club name and still break down by carry spacing.
What actually counts as a gap
For practical bag work, two problem types matter most:
- Carry separation that is too large. A real scoring issue starts when the space between neighboring clubs exceeds the player's usable shot window. For many mid- and long-club decisions, I want to see a gap that is big enough to create separation but small enough that the player is not forced to manufacture speed or take spin off.
- Carry overlap that is too tight. If two clubs finish within a few yards of each other on normal strikes, one of those slots is not doing enough work. The label on the sole does not matter if both clubs produce the same carry.
The top of the bag is where this shows up first. Fairway woods, hybrids, and strong long irons often look neatly spaced by loft stamp but collapse into the same launch window once real shots are exported and sorted. A hybrid loft chart for common top-end setups helps frame the discussion, but the decision still has to come from measured carry, dispersion, and a printed re-test plan for the exact gap you are trying to fix.
Preparing Launch Monitor Data for the Analyzer
A player can hit a session that feels clean, then get a bad gap chart because the file was built from the wrong sample. I see that more than bad math. A few warm-up swings left in the export, a ball change halfway through, or missing carry fields can turn a useful desktop analysis into guesswork.
A launch-monitor CSV is the right starting point because it gives Dialed Golf a file you can inspect, clean, save, and re-test later. That matters if you want a bag record that survives a loft tweak, a shaft change, or a top-end rebuild instead of living as one screen inside an app.
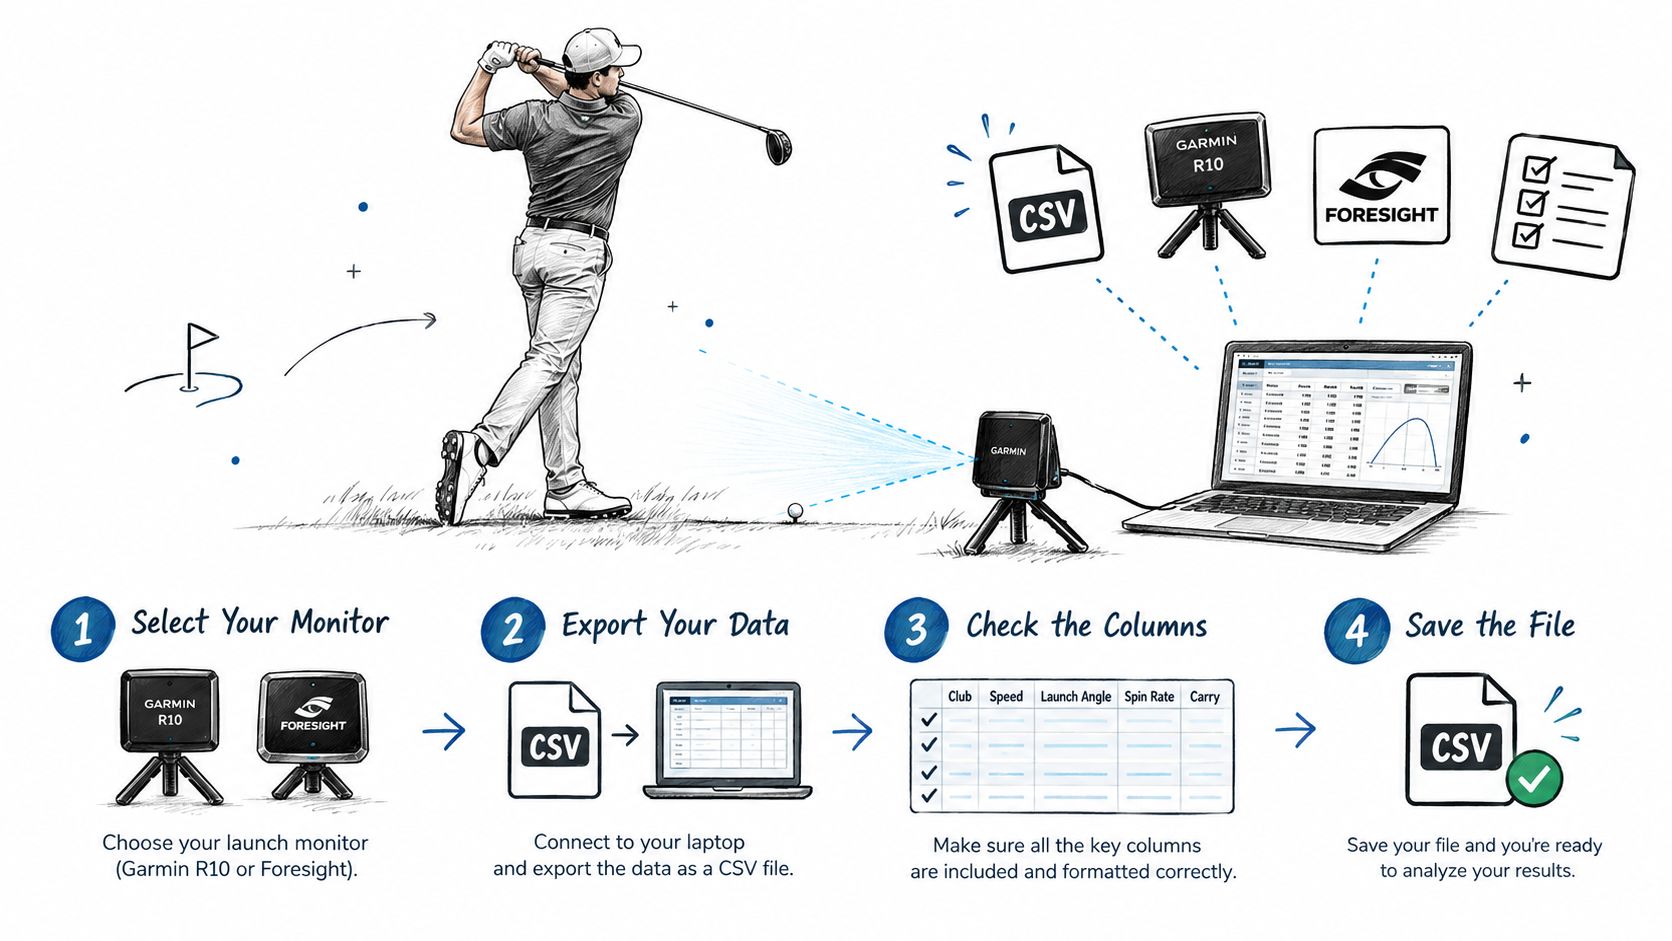
Stage one chooses a session you can export and trust
Use a launch-monitor session that can be exported as CSV. The analyzer does better work when the file comes straight from one recorded session, not from hand-entered notes copied across screens.
The trade-off is simple. A quick phone-only review is fine for casual range feedback. A real bag analysis needs a file you can audit row by row.
If the player wants a printed re-test plan later, the source session has to be stable enough to repeat.
Stage two builds a strike sample that holds up
Bag gapping sessions break down when every club is hit under a different version of "normal." Keep the warm-up separate. Use one ball model for the full session. Hold the lie and surface as constant as possible. Those controls do not make the numbers perfect, but they keep the errors small enough that the chart is still useful.
I also want enough shots per club to see the middle of the pattern, not just the single best strike. Five to 10 solid shots per club is a practical working range for this kind of session, with obvious mishits and clear outliers removed before import, as noted earlier from Clubhouse Golf gapping guidance.
That sample size supports named fixes later. If the 5 wood and hybrid overlap on only two swings each, there is nothing to diagnose. If they overlap across a proper sample, the re-test plan can be specific: loft change, club swap, or strike-pattern work, then another controlled session with the same setup.
Stage three keeps the columns the analyzer actually needs
For a dependable first pass, keep these fields in the CSV:
- Club
- Carry
- Total
- Ball speed
- Launch angle
- Spin rate
Those six are enough to sort clubs by real carry and start explaining why a gap is too wide or too tight. Optional fields can help if a problem needs more work, but they should not replace the basics.
The file should answer one practical question fast: what does each club carry on a normal strike, and what launch and spin pattern produced it?
Stage four cleans the CSV before import
Open the export on desktop before you upload it into Dialed Golf. Remove blank rows, duplicate header rows, test swings, and obvious junk entries. Check units. If carry is in meters in one column and the rest of the bag is being read in yards, the analyzer will show a problem that does not exist.
This part is not glamorous. It saves sessions.
I also check club labels before import because naming errors create fake gaps just as fast as bad yardages do. If one wedge appears as "PW" in half the rows and "Pitching Wedge" in the rest, or if a 4 hybrid is tagged as a 4 iron, the chart will split one slot into two. Clean labels in, believable gap map out.
For print-and-retest work, save the cleaned CSV with the session date and setup notes. That gives you a defendable baseline when the next test is trying to confirm one fix, not reopen the whole bag.
Importing and Configuring Your Session
The import step is where bag analysis stops being a notebook exercise and becomes a working record. On desktop, the workflow should feel more like setting up a fitting session than filling out a web form.
Start with a new bag entry and name it clearly. Player name, date, and club set is enough. That naming discipline matters later when the golfer compares seasonal changes, a shaft swap, or a rebuilt top end.
What to confirm before the first pass
When the CSV is uploaded, the important checkpoint is column mapping. Club, carry, total, ball speed, launch, and spin need to land in the correct fields before the analyzer does any sorting.
A clean import path also saves time when the launch monitor source is selected up front, because familiar file structures tend to auto-fill more cleanly. For readers using a desktop import workflow built around launch-monitor sessions, this CSV import walkthrough shows the core logic of the process.
Set the player context before trusting the chart. Handedness, temperature assumptions, and a consistent wind baseline keep carry adjustments from drifting between sessions. The point isn't to create a perfect weather model. The point is to make sure one session can be compared to the next without hidden environmental changes.
What the first analyzer pass should flag
The first pass shouldn't be read like a verdict. It should be read like triage.
Look for:
- Missing club labels: Shots that can't be grouped cleanly.
- Duplicate clubs: Two names attached to the same loft slot or test bucket.
- Out-of-range spin patterns: Usually a clue that strike quality or ball type changed mid-session.
- Sparse clubs: A long iron with too few solid strikes to represent its real carry.
One desktop-centered option in this category is Dialed Golf, which supports launch-monitor practice, live pair on desktop with Garmin R10 and expanding hardware support, plus CSV import from Garmin, Rapsodo, SkyTrak, FlightScope, Uneekor, GSPro, Awesome Golf, and more. The mobile app is a pocket caddy in TestFlight rather than an App Store general release, and the import-heavy workflow belongs on desktop first because that's where column mapping and validation are easiest. TestFlight builds can remain available for testing for up to 90 days from upload (Apple TestFlight details).
A short visual walkthrough helps if the file structure is unfamiliar:
Once the mapping and context are right, the golfer should have a carry chart that can be read club to club.
Reading the Gapping Chart and Tolerances
A player imports a clean launch-monitor CSV, the bars line up nicely, and the bag still makes poor decisions on the course. That usually happens because the chart gets read as a picture instead of a tolerance check.
Start with carry. Carry is the number that clears a front bunker, covers a forced carry, and lands on the right shelf. Total distance matters, especially with hybrids and fairway woods, but it belongs in the second pass after the carry gaps are sorted.
The carry windows that matter
For most bag analyses, I treat adjacent clubs in the scoring end of the bag as healthy when the carry gap sits in the low-teens and stays repeatable across solid strikes. Shorter players can work with tighter spacing. Faster players often need a little more room. The important part is not chasing one universal number. It is checking whether each club owns a distinct stock shot.
As a practical rule, an adjacent gap under about 8 yards usually behaves like overlap. Two clubs start covering the same job unless flight, spin, or descent angle separates them in a useful way. Once the gap pushes past roughly 18 yards, players often have to take speed off one club or step on the next. That can be fine for one transition in the bag, but it is a weak default.
Wedges deserve a stricter read. Loft spacing may look tidy on paper and still produce a messy carry ladder if strike quality or launch changes from one head to the next. In a Dialed Golf desktop session, I want the wedge section to print as a ladder the player can use. One stock number per club, predictable enough that a re-test on another day lands in the same neighborhood.
Healthy spacing gives each club a clear job. Poor spacing creates either duplicate shots or one yardage with no comfortable swing.
Bag Carry Tolerances and Overlap Zones
| Club Transition | Healthy Carry Gap (yards) | Overlap Warning (yards) | Void Warning (yards) | What to check first |
|---|---|---|---|---|
| Wedge to wedge | 10 to 15 | Under 8 | Over 18 | Loft, strike pattern, partial-shot role |
| Scoring iron to scoring iron | 10 to 15 | Under 8 | Over 18 | Face contact and launch window |
| Mid iron to long iron | 9 to 16 | Under 8 | Over 18 | Ball speed retention and peak height |
| Hybrid or wood transitions | 9 to 16 | Under 8 | Over 18 | Landing angle and carry bias |
| Any adjacent pair | Player dependent | Under 8 | Over 18 | Re-test with the same ball and target |
Those bands are working tolerances, not laws. A 7-yard gap can be playable if one club flies flatter into the wind and the other lands softer. A 19-yard gap can survive if the player owns an in-between shot and only sees that yardage a few times a month. The chart marks where to inspect. The session notes decide whether the gap is a problem.
What the chart catches and what it misses
The chart is very good at finding structure. It shows duplicate carries, a broken wedge ladder, and the dead spot that often appears between the longest iron and the first wood or hybrid. On desktop, that becomes even clearer because the CSV session can be filtered, relabeled, and re-run without guessing which shots belonged to which club.
It does not explain cause by itself.
A 16-yard gap might be a loft issue. It might also be one club launching too low, spinning too little, or getting tested with only three decent strikes. An apparent overlap can come from redundant lofts, but I also see it when a player delivers one club steeply and another shallow enough to erase the expected separation.
That is why each flagged gap needs a named fix and a printed re-test plan. If the issue looks like wedge compression and launch, the fix might be "bend 1 degree weak and re-test 8 shots." If the issue looks like a top-of-bag carry void, the fix might be "test a higher-loft hybrid against the current longest iron, same ball, same target, minimum 6 solid shots each." The chart shows where to work. The re-test confirms whether the change earned a new number.
Diagnosing Common Gap Problems
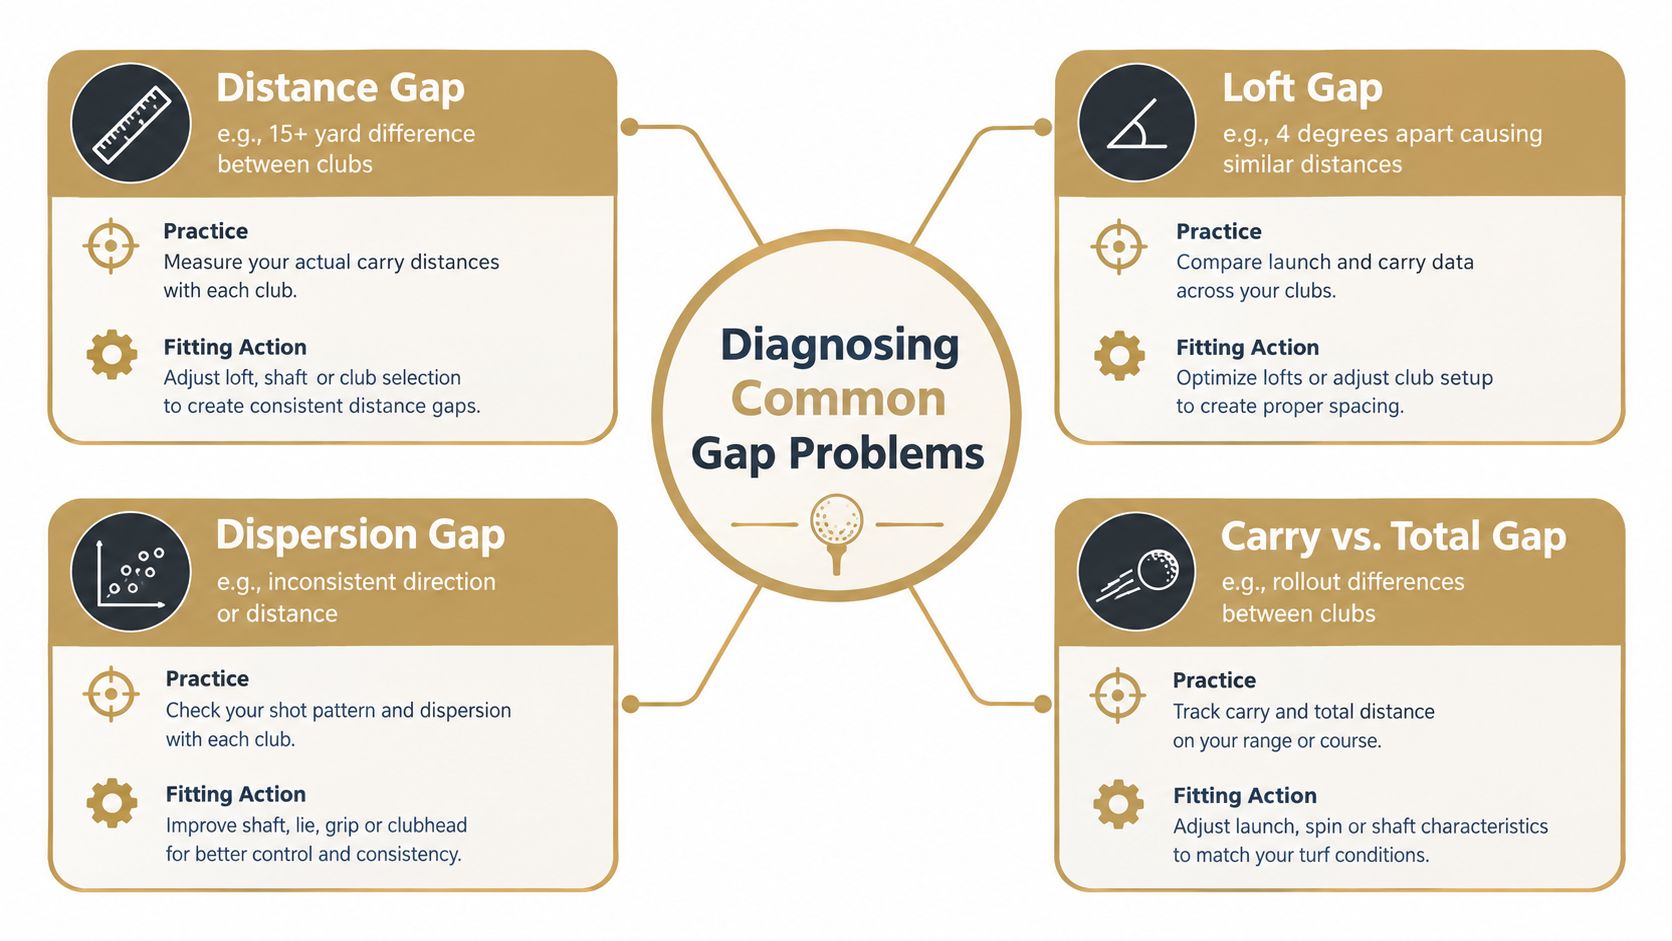
Once the chart identifies a bad transition, the next question isn't “what club should be bought?” It's “what kind of gap is this?” Different gap types need different fixes, and a lot of wasted money comes from treating every problem like an equipment problem.
Distance gaps
This is the obvious one. The carry chart shows a chunk of yardage with no stock club. These usually appear at the top of the bag or between a modern pitching wedge and the first specialty wedge.
The right fix is often one of these:
- Add a bridging loft: Another club head or loft option that owns the missing carry.
- Re-loft an existing club: Useful when the current spacing is close but still outside a playable carry band.
- Re-test after the change: The new club has to earn a unique carry number, not just a new label.
Loft gaps
Loft spacing can look neat on paper and still produce a messy bag. Some players deliver one club with enough speed and launch to stretch it, while the next club stalls. The lofts say one thing. The carry windows say another.
That's why loft should be treated as a clue, not the answer. If the loft progression is wide and the carry progression is still tight, the golfer may have two clubs doing the same job for different reasons.
Shop-floor note: The scorecard never asks what loft was in the golfer's hand. It only cares whether the shot had a reliable carry window.
Dispersion gaps
A club can fit the chart and still fail on the course. Sometimes the issue isn't distance spacing. It's that one club in the pair has a much wider start line or a much less stable strike pattern.
When that happens, the fix starts with practice before equipment:
- Run a strike-pattern session with face spray or impact tape.
- Separate center contact from thin and heel strikes in the file.
- Re-check the gap chart using only representative strikes.
If the carry window tightens and the dispersion improves, the club didn't need replacing. It needed cleaner delivery.
Carry versus total mismatches
This one fools golfers constantly. Two clubs can have distinct total distance while carrying almost the same number. That works fine on a dry fairway with room to chase. It fails on front pins, forced carries, and soft landing areas.
The fix is to choose bag slots by carry ownership first. Total still matters, especially in the longest clubs, but it shouldn't be the main sort key for the analyzer.
Each gap type needs a named response. Distance gap gets a loft or club decision. Loft gap gets a re-check against actual carry. Dispersion gap gets a strike and delivery audit. Carry-versus-total gap gets a course-use decision based on carry first.
Turning Gaps Into Practice and Fitting Actions
A good analysis should end with a sheet the golfer can print, mark up, and take to the range. If the chart stays on a screen, most bag problems survive untouched.
The printable carry chart
The handiest format is a one-page list sorted by carry, not by the order clubs sit in the bag. Each line should include club name, stock carry, typical miss, and the next club's carry window. That makes the empty yardages visible immediately.
A usable printout includes:
- The stock carry number: The central planning number.
- The no-fly zone: Yardages where the golfer shouldn't try to force either neighboring club.
- The intended use note: Tee option, approach club, wind club, or soft-landing club.
- The retest box: A small blank area to update the number after a change.
The re-test sequence
Not every change deserves a full rebuild. The most efficient sequence is targeted.
Start with the broken transition only. Hit the two neighboring clubs plus any candidate replacement or loft adjustment. Keep the same ball and the same environment. Remove obvious mishits, then compare carry windows again.
After that, run a mini confirmation session through the surrounding part of the bag. If a new club fixes one void but crowds the next slot, the solution isn't finished.
A gap isn't closed when a golfer likes the new club. It's closed when the surrounding carry windows stay clean after a re-test.
The final course step is practical. Mark the revised carry chart, then use it for a few rounds before making another change. Some clubs test well but still don't solve a specific shot pattern on the course. The chart should support decisions, not replace them.
Workflows for Players, Coaches, and Club Operators
The same analyzer output should travel cleanly between the golfer, the coach, and the shop. That only happens when everyone works from the same file and the same naming discipline.
Solo player workflow
The solo player should build the bag record over several sessions, not one emotional range day. Collect CSVs from three sessions, import them into a single bag workflow, and flag only the yardage windows that stay broken across sessions.
That keeps the player from booking a fitting every time one club has a bad afternoon. A reliable void is worth solving. A one-session anomaly usually isn't. For golfers using launch-monitor data as part of a broader practice stack, this launch monitor app guide is a useful companion read.
Coach workflow
A coach can turn a gap report into a structured review fast. Go club by club. Mark overlaps in red, mark voids as decision points, and assign a drill block to each one.
The handoff should stay explicit:
- Overlap issue: Test strike pattern and launch conditions.
- Void issue: Test neighboring lofts or alternate club types.
- Unstable club: Keep the slot, but train the strike before replacing hardware.
Club operator workflow
Club operators need repeatability more than anything else. Shared naming conventions such as Client_Date_ClubSet make files searchable later, especially when multiple staff members touch the same player record.
Quarterly reviews work well because they catch seasonal speed changes, equipment updates, and recurring member fit issues. The same data file should move from the player's session to the coach's review and then to the fitter without forcing a second collection day.
Re-test triggers should be fixed in advance. If carry changes materially, if a shaft changes, or if the season rolls over, the bag should be checked again. That keeps the workflow factual and calm instead of reactive.
Dialed Golf connects on-course decision support, desktop launch-monitor practice, and academy operations into one golfer record, which makes bag gapping easier to track over time instead of rebuilding it from scratch. Golfers who want to turn CSV exports into a practical carry chart and coaches or clubs that need the same file to move across roles can explore the workflow at Dialed Golf.