

8.1 million people used golf simulators or screen-golf systems in 2024, compared with 3.8 million in 2015, according to National Golf Foundation findings reported by the Indianapolis Business Journal. The same findings show that 51% of those users hadn't played a traditional course in the previous 12 months. A home golf simulator is no longer just an indoor substitute for an established golfer's outdoor game.
The buying decision starts somewhere less glamorous than the screen: the room is part of the measurement system. A compact space can support useful practice while still being unsuitable for the spin-dependent readings a golfer hopes to trust.
Table of Contents
- Why Golfers Are Building Simulators at Home
- How Much Room a Home Golf Simulator Needs
- The Core Parts of a Home Golf Simulator
- Choosing a Launch Monitor and Reading Its Data
- Practice Uses That Make a Simulator Worth It
- Build the Setup in Six Steps and Confirm Before You Buy
Why Golfers Are Building Simulators at Home
A golfer returning home after dark may have time for practice but no convenient place to hit balls. A garage simulator removes that scheduling barrier. Bad weather, limited daylight and the time between rounds become less restrictive when a practice area is already assembled.
But a simulator isn't just a projected course. Its launch monitor records the shot, and the software uses those measurements to display flight and organize practice. The screen makes the experience immersive; the room and monitor determine whether the feedback is useful.
Different buyers need different versions of that system:
- Existing golfers may want to improve strike consistency or understand their club distances.
- Newcomers may prefer learning how to make contact before visiting a traditional course.
- Coaches may need a repeatable environment where a golfer can complete a drill and review the results.
Consider a golfer whose main concern is inconsistent iron contact. A safe hitting area, dependable ball-speed readings and saved sessions may be more useful than a large projected image. Someone buying mainly for family course play will place greater value on the enclosure, display and entertainment software.
Buying principle: The best starting point is a practice question, not a screen size.
Room dimensions come first, followed by the core parts, monitor selection, data interpretation and practice routines. A measured build process then turns those choices into a pre-purchase check, helping the buyer judge whether the available space and budget fit the intended use, and which component deserves the first purchase.
How Much Room a Home Golf Simulator Needs
Room dimensions for home simulator planning
| Dimension | Planning value | What it affects |
|---|---|---|
| Tee to impact screen | Approximately 10–12 ft, in BenQ's space-planning guide | Ball-flight space and separation from the screen |
| Clearance behind impact screen | About 1.5 ft, using the same planning guide | Screen deflection and protection of objects behind it |
| Total room depth | Rough planning baseline of 13 ft, not a universal equipment minimum | Initial room screening before device-specific checks |
| Typical facility installation footprint | About 15 ft wide, 13 ft high and 21 ft deep, in the National Golf Foundation simulator white paper | Reference size for larger installations |
| Width for right- and left-handed hitters | Unknown as a universal figure; allow mirrored stances and unrestricted swings | Alignment without changing swing path |
| Ceiling height for hitting clearance | Clear the tallest user's full swing with the longest intended club | Hands, shaft and clubhead clearance |
These are planning references, not interchangeable minimums. The larger facility footprint describes a different installation context from a compact garage. Likewise, the rough total-depth baseline doesn't guarantee that a particular monitor, hitting position and screen arrangement will fit together.
The usable measurement is the clear space after accounting for everything installed in the room. A screen frame, shelving unit, ceiling beam or garage-door rail can remove space that appears available on a floor plan.
Why tracking technology changes the answer
Radar generally needs more depth because it must observe ball flight. Camera-based systems can operate closer to the ball by capturing conditions around impact. Each device still has its own placement requirements, which take priority over a generic room-size recommendation.
Consider a compact garage with plenty of width but limited depth. A camera-based setup may work well there, while a radar unit may lack the observation distance needed for trustworthy readings. Buying the radar unit first and squeezing it into the remaining space reverses the correct decision order.
A short room isn't automatically useless. It may support controlled contact practice or speed trends, provided the selected device works within its installation requirements. It should not automatically be treated as a reliable environment for spin-sensitive wedge testing.
Swing clearance is separate from tracking clearance
A monitor can have enough room while the golfer doesn't. Narrow side walls may encourage a player to move the feet, flatten the swing or change alignment. Those adjustments can alter the very club-delivery patterns being measured.
Shared bays need special attention. An offset hitting position that suits a right-handed player may leave a left-handed player too close to a wall or outside the device's hitting area.
The clearance test should begin without a ball, using slow rehearsal swings from the proposed tee position. The golfer should check the backswing, follow-through and hand clearance before attempting a normal swing, and stop if any part feels constrained.
A smaller image is an acceptable compromise. An altered swing or inadequate tracking distance isn't.
If the room falls short, a camera-based monitor may solve a depth problem. It won't solve an unsafe ceiling or wall clearance problem; those may require a shorter-club practice area or a different room.
The Core Parts of a Home Golf Simulator
The most common build mistake happens before anything gets mounted: the golfer orders an enclosure and projector, then learns the launch monitor they wanted needs more room depth than the space allows. Selection order matters more than any single purchase. The launch monitor sets the geometry, the screen gets sized around the safe hitting area it defines, and everything else fills in around those two.
The component diagram shows how the pieces connect.
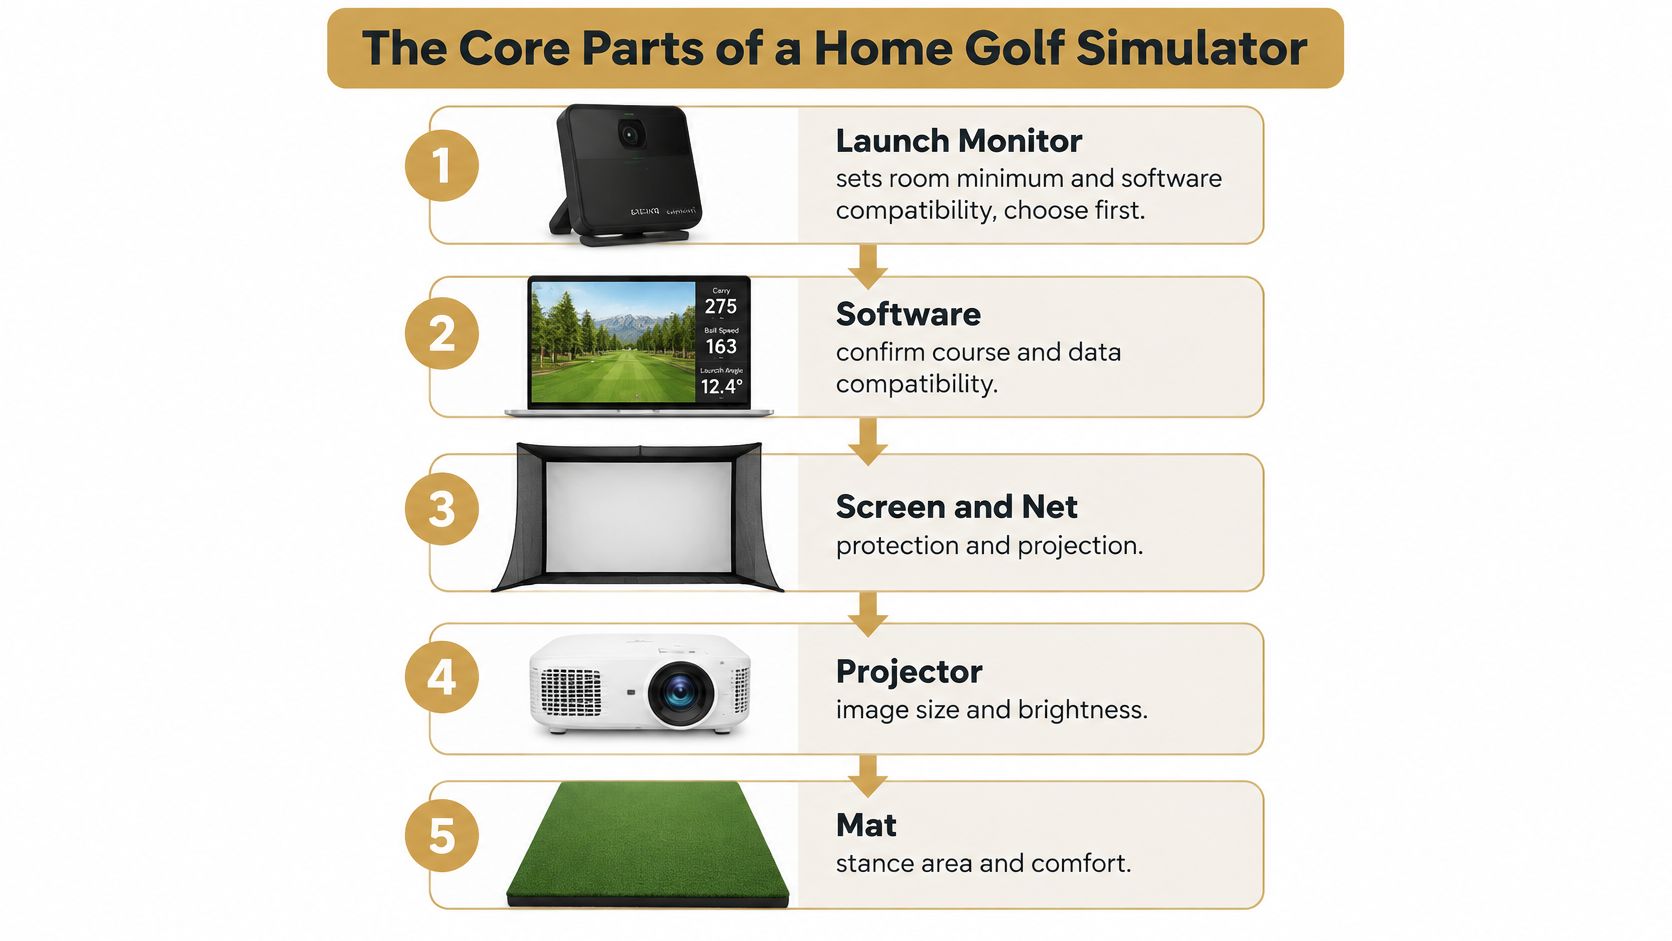
Each part does one job, and each raises one question worth answering before money changes hands.
| Part | Job | Typical choice | Question before buying |
|---|---|---|---|
| Launch monitor | Measures supported ball and club variables, such as speed, launch and spin | Radar-based or camera-based unit | Does the room meet its placement requirements? |
| Impact screen | Catches balls and provides a projection surface | Hitting net with separate display, or screen enclosure | Is there safe clearance behind it? |
| Projector or display | Shows the simulated course or practice results | Projector or large display outside the strike area | Will the image remain visible under the room's lighting? |
| Computer | Runs software and stores sessions | Desktop or laptop | Does it meet software requirements and handle the monitor's files? |
| Hitting mat and tee area | Establishes the repeatable hitting position | Stable mat with a marked tee location | Will the hitting position remain fixed? |
| Lighting and ceiling clearance | Supports tracking and an unobstructed swing | Controlled, diffused lighting and clear overhead space | Can lighting remain consistent throughout practice? |
| Simulation software | Turns captured shots into practice feedback or course play | Range, drill or course-play software | Does the required connection actually work? |
Choose protection before presentation
New builders often treat "impact screen" and "net" as the same thing. They solve different problems. A net-only setup catches the ball and sends the numbers to a separate display, which suits a golfer whose goal is practice data rather than a projected course. In a shallow room that already limits which monitors will work, the net is often the honest match: the goal is controlled practice, and a projected course adds cost without changing what the room can measure.
A projected course needs a true impact screen and a projector. Either way, containing mishits comes before image quality: side protection, padding on exposed frame edges, and the position of nearby windows. People and pets should stay outside the hitting area.
The projector then needs a mount position clear of the swing and free of shadows across the image. The computer sits somewhere protected from balls, feet and moving clubs, with cables routed away from the stance.
Fix the physical reference points
The mat should stay stable under feet and club. A shifting mat creates a different hitting position even if the monitor never moved, and the data starts describing a swing the golfer didn't make. A replaceable hitting strip simplifies maintenance without replacing the whole stance surface.
Lighting gets tuned near the end of the build, but it belongs in the selection conversation from the start. Camera tracking and a projected image can ask for opposite things: the camera may want bright, even light on the ball while the projector wants a dimmer room. That tension is easier to resolve before anything is bolted down.
The launch-monitor selection guide for range practice provides additional context for golfers who also intend to take their monitor outdoors.
The completed checklist is short: compatible monitor and software, safe ball containment, a usable display, a suitable computer, a stable mat, controlled lighting and unrestricted swing clearance. One last check trips people up: range-and-practice software and course-play software do different jobs. Dialed Golf's desktop app, for example, records and organizes range and practice sessions for one golfer, while a dedicated simulator engine for full-course play is planned. Expecting practice software to render eighteen holes is a mismatch worth catching early.
Choosing a Launch Monitor and Reading Its Data
A golfer with a 10-foot-deep garage faces a different buying decision than one with a 20-foot basement, and the difference is physics rather than price. Radar units watch the ball fly, so shallow rooms starve them of the flight they need to model spin and carry. Camera units photograph impact instead, which lets them sit closer to the ball but makes them fussier about light and alignment. Pick radar only if your bay gives it the depth it needs.
| Monitor type | Room depth need | Strength | Limit |
|---|---|---|---|
| Radar-based | More depth to observe ball flight | Ball-flight tracking and carry analysis when correctly installed | Reduced reliability in shallow rooms |
| Camera-based | Can operate closer to the ball | Captures impact conditions directly | Sensitive to lighting, alignment and setup requirements |
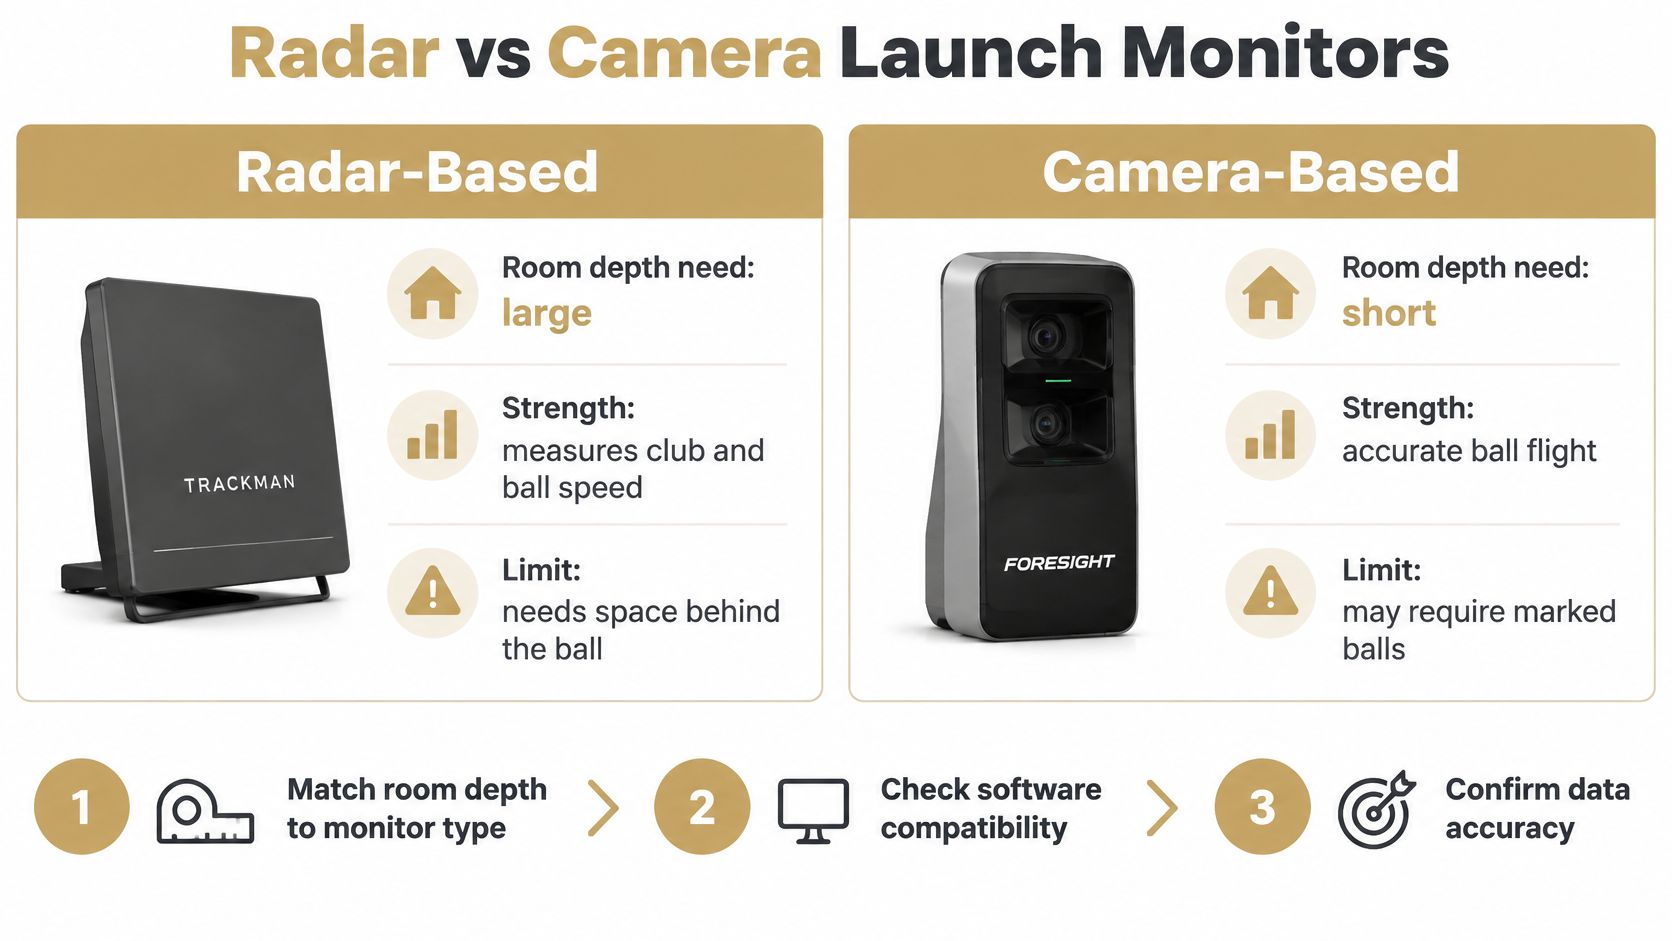
A small room can still be excellent for practice. The trade-off appears in the data, where spin-dependent numbers lose reliability first. Match the monitor to which measurements you plan to trust, and the room compromise stops being a problem.
Make the compatibility decision before purchasing
The first choice is whether the monitor's required geometry fits the room. The next is whether its data reaches the software in the form the golfer needs.
Dialed Golf's desktop app supports live pairing with Garmin R10 first, with other live-pair connections expanding. It also supports CSV or session imports from Garmin, Rapsodo, SkyTrak, FlightScope, Uneekor, GSPro, Awesome Golf and more. A listed import path shouldn't be mistaken for live pairing with every device.
Live capture suits a golfer who wants shots recorded during practice without a separate export step. File import suits someone already recording sessions elsewhere who wants to review those results together. The launch-monitor app guide helps distinguish those workflows.
Compatibility checks should include the fields being transferred. A file containing carry and ball speed doesn't necessarily include spin axis or club-delivery measurements. Missing fields shouldn't be interpreted as zero.
Read each metric with the right level of confidence
Comparative testing summarized by My Golf Simulator found ball speed to be the most stable metric across tested units, while spin showed the widest variation. That makes a repeatable speed trend more useful than an isolated spin surprise.
Carry works differently again. It is a derived result, calculated from launch conditions and assumptions such as atmosphere and the software's flight model. A precise-looking carry number doesn't mean the ball flew that distance indoors.
In MyGolfSpy's independent launch-monitor testing, lower-priced units sometimes differed from a reference by 20–30% on indoor spin, while carry differences across tested products ranged from under a yard to nearly 20 yards. Those findings don't hand every device a blanket error allowance, but they show why individual readings need context.
For comparisons, the golfer should preserve:
- Equipment conditions: The same monitor and ball type.
- Physical conditions: The same tee position, alignment and lighting.
- Software conditions: The same configuration and flight assumptions.
- Session context: Notes about intentional changes, misreads and unusual strikes.
A persistent ball-speed change across comparable sessions deserves investigation. A single strange spin reading deserves a setup and capture check first.
Cross-device comparisons need normalization before supporting a swing or equipment conclusion. That means comparing like fields, units, settings and test conditions, rather than combining unlike exports into a single unquestioned average.
Practice Uses That Make a Simulator Worth It
A golfer hits five 7-irons and five 8-irons on an unchanged setup, and the two clubs carry only 4 yards apart. Before anything gets replaced, the sensible moves are checking strike quality, confirming the sample is consistent, and seeing whether the overlap persists in a second session. That single question, repeated patiently, is what makes a home simulator worth its floor space.
The payoff depends on use. 68% of surveyed simulator owners used their simulator at least 10 times per month, according to a 2025 report from First Call Golf. A modest bay that runs every week teaches a golfer more than an impressive installation that rarely gets switched on.
Useful practice starts with a specific question. A gapping session, a ball comparison and a coached drill each ask the room to do something different, and each deserves its own plan.
Club gapping and ball comparisons
For gapping, the golfer records representative carry results for each club on an unchanged setup. The session works like measuring a staircase: the step between each club carries the information, and the tallest single shot is beside the point. A structured gap analysis turns those observations into a clearer picture of overlaps and missing distances.
For ball testing, each candidate ball type should receive a comparable block of shots within the same session. Ball speed and repeatable launch patterns provide useful starting points. Spin deserves more caution in a compact room, where limited ball flight before the screen makes spin capture the shakiest part of most setups.
A golfer comparing a familiar ball with a softer-feeling alternative should look for a pattern across representative strikes, since one long outlier says little about which ball fits.
Strike changes and coached routines
Strike and path work begins with a defined change. A golfer adjusting setup might watch ball speed and launch consistency, then check whether the improvement remains across later sessions. Ball flight offers clues about club path, while a device that measures path directly gives the fuller answer.
Coached practice benefits from the same discipline. A hypothetical six-week routine could repeat the same drill each week, using comparable clubs and conditions while the coach checks whether the intended pattern becomes easier to reproduce.
The most useful session records include:
- The task: The drill or equipment question being tested.
- The metric: Carry spacing, ball speed, launch or another supported field.
- The trend: A narrower spread, repeatable improvement or persistent overlap.
- The next decision: Continue, adjust or validate elsewhere.
Indoor results flag a promising change. The confirming step happens outdoors.
Consequential wedge and driver purchases earn that outdoor check before commitment. Golfers seeking better distance control begin with gapping, and those seeking cleaner contact begin with a repeatable strike drill. The first session answers the golfer's main question, and matching that practice to what the room measures well is what turns the simulator from furniture into a coach.
Build the Setup in Six Steps and Confirm Before You Buy
A room that photographs well can still feed a launch monitor bad numbers. Physical installation and measurement validation are two separate jobs, and the second decides what the first was worth. A compact bay can be perfectly serviceable for strike and carry practice while degrading spin-dependent data, so the goal for the space should be settled before a single bracket is mounted.
The installation overview shows how the physical components fit together.
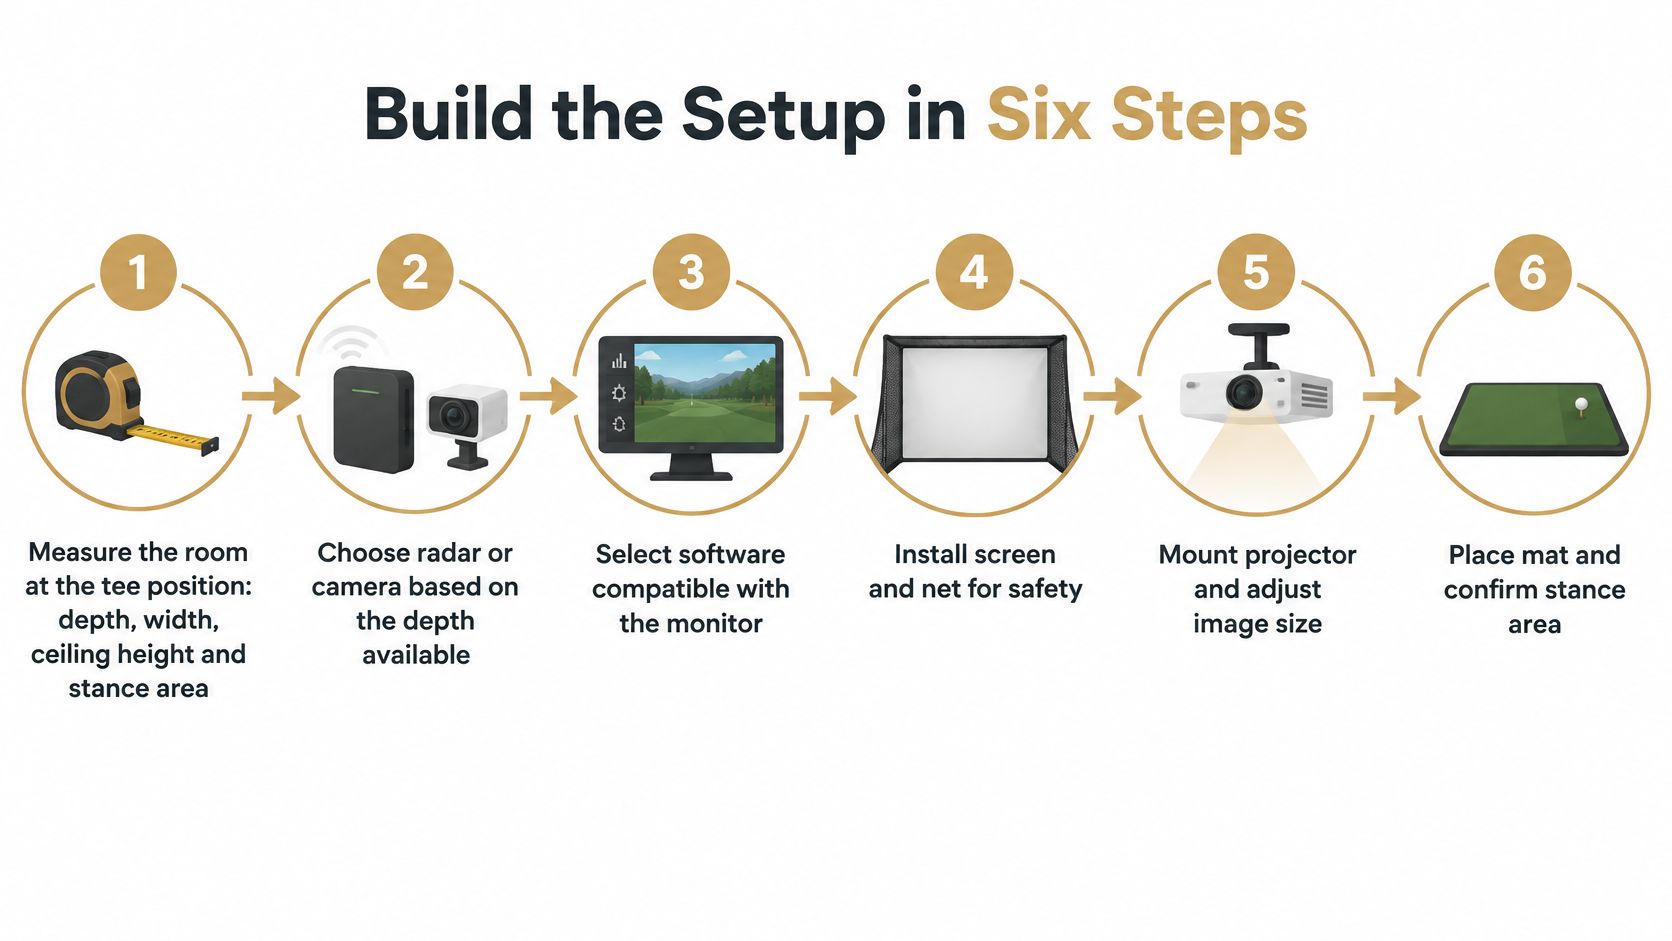
The build sequence
Measure at the proposed tee position. Record clear depth, width, ceiling height and stance space with a tape measure, including beams, door tracks and other obstructions. Compare the proposed arrangement with the planning values and the exact monitor's installation requirements.
Select the tracking approach. Choose radar or camera around the usable space, measured the way the device will see it, and treat a device that cannot achieve its specified placement as disqualified. A monitor installed outside its geometry produces data that later corrections rarely rescue.
Verify the complete software path. Confirm the required live connection or import format, operating system and available shot fields before purchasing. A representative exported file is more useful than a general claim that a brand is supported.
Install containment and control the environment. Position the screen, side protection and any overhead protection with the specified clearances, then mount the display equipment outside the swing and strike zones. Adjust lighting to avoid glare while preserving the monitor's required capture conditions.
Mark and test the hitting position. Mark the tee, mat edges and monitor location, then record distances, mounting height and lighting configuration. As a practical commissioning exercise, a golfer could hit 20–30 shots with the same ball, inspecting representative strikes for steady, plausible ball-speed readings from shot to shot.
Save the configuration and repeat the check. Keep a setup record with the session, including photos or notes that make restoration straightforward. A monthly repeat test is a useful maintenance routine, with an additional check whenever the mat, monitor, lighting or software settings change.
The commissioning test works like a scale check: weigh the same known object twice and confirm the readout holds. Frequent missed captures, readings that shift after a setup adjustment, or numbers that stay implausible on ordinary contact all point back to geometry or environment before they point to the golfer.
The accompanying setup video offers another visual reference for planning the installation.
Keep one useful golfer record
Sessions become comparable when they land in one place. In Dialed Golf's macOS and Windows range-and-practice app, a golfer adds the clubs they play to a locker, then pairs a supported launch monitor at the range or imports a session from sources such as Garmin, Rapsodo, FlightScope, SkyTrak, Uneekor, GSPro or Awesome Golf. Live capture stores shots locally, and saved sessions show carry, total distance, ball speed, spin, launch and club-speed trends where the monitor supplies those fields.
A dedicated simulator engine for full-course play is still planned, so golfers shopping mainly for course play should weigh that scope before committing. The trends any software records also inherit the room's limits: carry gapping from a compact bay can guide real decisions while spin numbers from the same bay may still need an outdoor check. Seven free web tools run without an account, and the Carry Distance Chart Generator turns established distances into a printable bag reference once representative numbers exist.
The final pre-purchase check
Before money is committed, the buyer should be able to confirm every item below:
- Tracking geometry: The actual installation meets the selected monitor's requirements.
- Natural movement: Every intended user can swing without changing posture or avoiding an obstruction.
- Shared use: Both handedness positions fit if right- and left-handed golfers will use the bay.
- Controlled conditions: Tee position, alignment and lighting can remain consistent.
- Safe containment: Mishits and screen deflection have been considered, not just straight shots.
- Usable data: The intended software receives the fields needed for the practice question.
- Fit to the goal: The room's compromises line up with the intended work, whether that is strike quality, carry spacing or spin-dependent measurement.
- Complete budget: The cost includes protection, mat, computer, display, software and installation accessories, not just the monitor.
The expected result is steady ball-speed behavior and repeatable carry patterns for comparable strikes, with misreads investigated before gapping or purchase decisions begin. A setup that still produces erratic readings needs troubleshooting before it needs new hardware.
Golfer Pro covers the consumer app and desktop at $9.99/week, $29.99/month, $149.99/6 months or $249.99/year, while the free tools stay free with no account. Ranges and clubs use the separate Dialed Academy memberships product at $99.99/month or $999.99/year per facility, and the club keeps its dues. Golfers ready to put a validated bay to work can explore the practice workflow at Dialed Golf and choose a supported capture or import path.